Skip to content

Having a jute bag is great, but a plain one can feel a little boring sometimes. The problem is you might not know where to start or which methods are best for a durable bag. You want a bag that stands out and feels uniquely yours, but how do you do it without messing it up?
You can easily customize your jute bag using simple DIY methods like painting, embroidery, or adding accessories. The best method depends on the bag’s style. For tote bags, painting or accessorizing works well. For drawstring bags, punch needle embroidery is a great option because the fabric is softer and easier to work with.
I remember when I first got into sustainable packaging, I had a bunch of simple jute tote bags, and I felt like they needed something extra to make them special. I thought about all the creative people I know—the ones who run small shops and e-commerce stores—and I knew they would want a bag that was an extension of their brand. So I started playing around with different ideas. I found that if you know a few basic tricks, you can turn a simple jute bag into a piece of art that really tells a story.
What Do I Need Before I Start My Jute Bag DIY Project?
Wanting to start a DIY project is exciting, but nothing kills your creative flow faster than not having the right tools. I know I have been there—ready to go, only to find I am missing a key item. This can make the whole process frustrating and can stop you from even getting started.
Before you start your jute bag DIY project, you will need a few simple supplies. Gather items like fabric paints, brushes, embroidery thread, a punch needle, and a pencil to sketch your design. If you want to add accessories, get things like ribbons, beads, and different colored fabrics that can be sewn or glued on.

When I was first trying out these projects, I learned that having a plan and all your supplies ready makes a huge difference. I like to think about the different types of customizations I can do and then get everything I need in one go. For me, the process is about breaking down the project into simple, manageable steps, and that starts with preparation. I like to lay everything out on my workspace, so I can see what I have and what I am working with. For painting, I get my paints, brushes, and some paper to practice on. For punch needle embroidery, I have my yarn, punch needle, and a small hoop. This helps me stay focused and organized, which makes the whole project more enjoyable.
What Supplies Are Best for Each DIY Method?
| DIY Method | Essential Supplies | Why They Are Best |
|---|---|---|
| Painting | Fabric paint, paintbrushes, stencils, pencil | Fabric paint sticks to the jute fibers and resists cracking. Stencils help create clean lines and complex patterns without needing great drawing skills. A pencil lets you sketch your design first. |
| Punch Needle Embroidery | Yarn, punch needle, embroidery hoop, fabric marker | Yarn creates a textured, raised design on the fabric. A punch needle makes it easy to create loops quickly. A hoop keeps the fabric taut, and a fabric marker lets you draw your design without it washing away later. |
| Accessorizing | Ribbons, beads, buttons, fabric glue, needle and thread | These items add texture and dimension to the bag. Fabric glue is great for quick attachments, and a needle and thread are perfect for securing items that need to last. Using a variety of materials lets you create a unique look. |
When it comes to the different methods, each one has its own set of tools that make the job easier. For painting, I find that a simple set of acrylic fabric paints1 works best. They are easy to find and come in many colors. For punch needle embroidery, I always make sure I have the right size punch needle for my yarn. Jute can be tough, so you want to make sure your needle can handle it. And for adding accessories, I keep a stash of ribbons, buttons, and beads. I have found that gathering these supplies is not just about having what you need, but also about giving yourself options. Sometimes I think I will paint a bag, but then I get inspired to sew on some buttons instead. Having all these supplies ready means I can be flexible and creative.
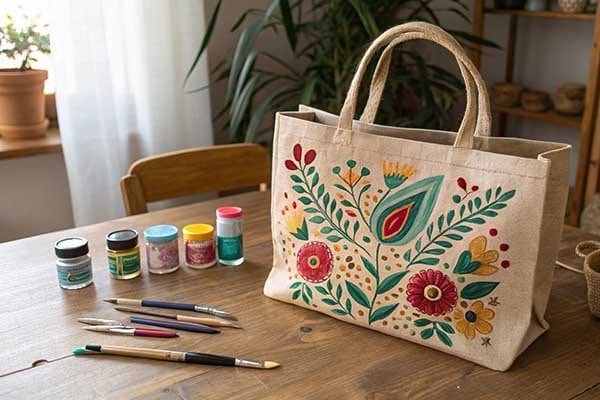
Decorating Jute Tote Bags: Is Painting or Adding Accessories Best?
When I first started customizing my jute bags, I realized that not all bags are made for the same kind of DIY project. A jute tote bag has a different structure than a drawstring bag, and this changes what you can do with it. You want to make a beautiful bag, but you might worry that the rough surface of the jute will ruin your design.
For decorating jute tote bags, painting and adding accessories work best. Many tote bags have a stiff inner lining to help them hold their shape, which makes punch needle embroidery difficult. You can treat the bag as a canvas for painting or use ribbons, buttons, and other accessories to make it unique without needing to stitch anything. The coarse texture of jute can be a challenge, so you should trim any loose fibers before you start painting.

I have always loved the look of hand-painted bags. I think it adds a personal touch that you just cannot get with a machine-made product. I once had a client who was a small-scale designer, and she wanted her tote bags to have a custom-painted logo on them. We tried a few different methods, but we found that a simple hand-painted design worked best. She loved the idea that each bag was slightly different and had a unique, handmade feel. I think that is the kind of story that helps a small business stand out. I found that I like to use a small paintbrush for details and a slightly larger one for covering bigger areas. It is all about finding what feels right for you and what works with the bag’s material.
A Step-by-Step Guide to Painting and Accessorizing a Jute Tote Bag
| Step | Method: Hand-Painting | Method: Adding Accessories |
|---|---|---|
| 1. Preparation | Make sure the surface of the bag is clean. I like to trim any stray jute fibers with scissors to create a smoother surface for the paint. | Lay out all your ribbons, beads, and other accessories. I always like to plan where each item will go before I start attaching anything. |
| 2. Design | Use a pencil to lightly sketch your design onto the bag. This acts as a guide and helps you get your idea just right before you start painting. | If you are using fabric glue, make a small mark with a pencil where each item will go. If you are sewing, use a fabric marker to mark your stitch lines. |
| 3. Application | I usually start with the lightest colors first. This helps prevent dark colors from smudging into the lighter ones. Let each layer of paint dry completely before adding another color. | For ribbons, I wrap them around the handles. For buttons and beads, I use a needle and thread to sew them on securely. For items like pom-poms, I use fabric glue for a strong hold. |
| 4. Finishing | Once the paint is dry, I use a fabric-sealing spray to protect the design. This makes sure it will not crack or fade over time. | I double-check all my attachments to make sure they are secure. I do not want anything to fall off after just a few uses. I trim any loose threads or glue. |
I have found that the trick to a successful DIY project is not being afraid to get a little messy. When I paint, I always put down some newspaper to protect my workspace. I also found that it is okay if your lines are not perfectly straight. The charm of a hand-painted bag is in its imperfections. For accessories, I like to mix and match different textures. For example, a piece of satin ribbon looks great next to some wooden beads. It is all about experimenting and seeing what looks good to you. I find that these projects are not just about the final product, but about the fun you have while making them.
What Is the Best Way to Punch Needle Embroider a Jute Drawstring Bag?
A drawstring bag is a great choice for a DIY project because the fabric is usually softer and more flexible than a tote bag. This makes it perfect for a method like punch needle embroidery. However, you might be worried about your design not turning out right, or maybe you are not sure how to make the stitches look clean and even.
To punch needle embroider a jute drawstring bag, you should first sketch your design with a pencil. For a Christmas tree pattern, draw the outline first. Then, use a punch needle and colorful yarn to punch your design into the bag. The flexible fabric of a drawstring bag is perfect for this method. You can follow a video tutorial to guide you through the process, making it easier to create your desired pattern.

I have always loved the look of punch needle embroidery2. It creates a beautiful, textured surface that feels so cozy and inviting. When I decided to try a Christmas tree design on a jute drawstring bag, I found that starting with a clear sketch was key. It helped me visualize where each color would go. I also found that watching a few video tutorials really helped me get the hang of the punching motion. It is a rhythmic process, and once you get into the flow, it is incredibly satisfying. I often use these customized bags as gift bags during the holidays, and everyone always asks where I got them. The feeling of saying "I made it myself" is priceless.
Step-by-Step Instructions for a Simple Punch Needle Embroidery Project
| Step | Action | Why This Step Is Important |
|---|---|---|
| 1. Choose Your Design | Select a simple pattern like a Christmas tree, an initial, or a geometric shape. You can find many ideas online for beginners. | A simple design is less intimidating and helps you learn the basic punch needle technique without getting overwhelmed. It also makes the project more enjoyable. |
| 2. Prepare Your Bag | Lay the drawstring bag flat. Use a pencil to lightly sketch your design onto the fabric. Then, place a small embroidery hoop on the area you want to embroider to keep the fabric taut. | Sketching your design first gives you a clear path to follow. A hoop holds the fabric tight, which makes your loops more even and your final design cleaner. |
| 3. Thread Your Punch Needle | Cut a length of yarn, usually about 18 inches, and thread it through your punch needle according to the tool’s instructions. | Using a shorter length of yarn prevents it from getting tangled while you are punching. Correct threading ensures the needle works properly to create loops. |
| 4. Start Punching | Begin by pushing your punch needle through the back of the fabric, following your sketched lines. Punch one loop at a time, keeping the needle close to the fabric. | Starting from the back hides the knot and gives your design a professional look. Punching close to the fabric creates even loops and a denser, more textured design. |
I remember my first punch needle project was on a small jute drawstring bag. I chose to do a simple Christmas tree. It was not perfect, but I was so proud of it. I found that if you take your time, the process can be very calming. I also learned that using a good quality yarn makes a big difference. It is less likely to fray, which makes the whole process smoother. And do not worry if your loops are not all the same size. The handmade look is what makes a DIY project special. It shows that the bag was made with care and personal attention.

Is Canvas Jute Bags Better for Painting?
I love working with jute because of its natural, earthy feel. But I have also seen a lot of great canvas jute bags on the market. These bags combine the natural look of jute with the smooth texture of canvas. This makes them a great option for people who want to do more detailed DIY projects.
Canvas jute bags are better for painting because the smooth surface of the canvas offers a much better surface for detailed designs. The canvas part of the bag is perfect for painting a full scene or a complex logo because the paint goes on smoothly and the colors look more vibrant. This makes the canvas jute bags a great choice for artists who want to create more intricate designs.
![]()
I have always been a fan of trying out new materials, and when I first came across a jute bag with a canvas panel, I knew it would be perfect for painting. The smooth canvas surface is a dream to work with. I can use stencils to create clean lines or just paint a design freehand without worrying about the paint bleeding into the coarse jute fibers. For my business, I find that a canvas bag is a great middle ground. It has the eco-friendly feel of jute, but it also gives me a smooth canvas to add my branding or a custom design. This versatility is what makes these bags so popular with my clients.
Painting on Canvas-Blend Jute Bags: A Guide
| Step | Action | Why This Is an Improvement over Pure Jute |
|---|---|---|
| 1. Preparation | Make sure the canvas part of the bag is flat and clean. You may need to press it with a warm iron to remove any wrinkles. | A flat canvas surface means no bumps or uneven spots, so your paint goes on smoothly, unlike with rough jute. This gives you a more professional result. |
| 2. Sketching | Use a pencil or a fabric marker to draw your design on the canvas panel. You can draw a very detailed design without worrying about the pencil lines being hard to see. | The smooth canvas makes it easy to sketch precise and intricate designs. The lines are much clearer, which helps a lot when you are painting small details. |
| 3. Painting | Use fabric or acrylic paints and brushes to fill in your design. You can use a variety of brush sizes to get different levels of detail. | The paint will not bleed or spread as much on canvas, which allows for much cleaner edges and more vibrant colors. You can paint a full picture with many colors. |
| 4. Finishing | Let the paint dry completely. Then use a fabric medium or a clear spray to seal the design. This will protect your work and make sure it lasts. | Sealing the paint is easier on canvas. It creates a smooth, even finish that protects the design from cracking and wear. Your art will stay looking great for a long time. |
I have always found that the texture of a material plays a huge role in the final look of a project. With pure jute, you get a rustic, textured look that is perfect for simple designs. But with a canvas jute bag, you get the best of both worlds. You get the natural feel of jute with the ability to create a polished, detailed design on the canvas part. I have used this method for bags with company logos, and the results have been fantastic. The logos look sharp and professional, and the colors are bright and clear. It is a great way to combine natural materials with a modern design.
Finished Bag Ideas and Creative Uses
Once you have finished your DIY project, you have a unique bag that you can use for many things. You have put your time and creativity into it, and now you have a bag that no one else has. You might be wondering what you can do with your new bag, and I have some ideas that might inspire you.
Your finished bag is perfect for carrying your daily essentials, but it can also be used as a special gift bag for friends and family. A hand-painted tote bag can be a great statement piece, and an embroidered drawstring bag can be used as a lovely pouch for small items. These bags are not just functional; they are a representation of your creativity.

I have always thought that a handmade item makes the best gift. When I give a friend a custom-made jute bag, I feel like I am giving them a part of my creativity. I have seen clients use their finished bags as a way to promote their brand at trade shows. They fill them with samples and give them to potential customers. It is a great way to make a memorable impression. I also know a few people who use their custom-made jute bags as stylish shopping bags, which is a great way to show off their personality while also being eco-friendly. The possibilities are endless.
Conclusion
Customizing your jute bag is a fun way to express your creativity. You can use simple methods like painting, punch needle embroidery, and accessorizing to make your bag truly unique. The best method depends on the bag’s type, but with a little preparation, you can create a beautiful and personal item.